Adding ATC cards into an art journal!
Hello friend! Let's create some ATC cards and some pockets for the ATC’s, so you can put them in your journal.
We’re going to use materials from Devid’s latest 3 collections. If you miss some of these stamp- or die sets, you always can replace it with something from your stash. Be creative! It makes your creation fabulous and unique!
Step 1: Let’s take the base page die from the die set: Labels, Tags and More. It is a base page for the TN-Square XL. We’re going to cut 2 base pages. The first one can be any color (I choose craft paper). The second one is going to be used as a matte layer. I used the Coffee Dyed Papers for this one, but you can choose any paper you like. Fold the second base paper in halve, so you can see the middle line. Then cut this paper, double layered, a couple of millimeter from the centre and from the bottom as well. Now you have 2 halve pages a little smaller and shorter as the matte layer. My base page had rounded corners, but because I’ve shortened the page, one of them isn’t that pretty anymore, so I rounded mine with a corner punch.

Step 2: Take the smallest die strip from the set: Journal Sleeve Fillers 1 to create 4 pocket openings. You can see how on the picture.
If you like to ink the edges, now is the time to do it. But don’t glue them down yet.
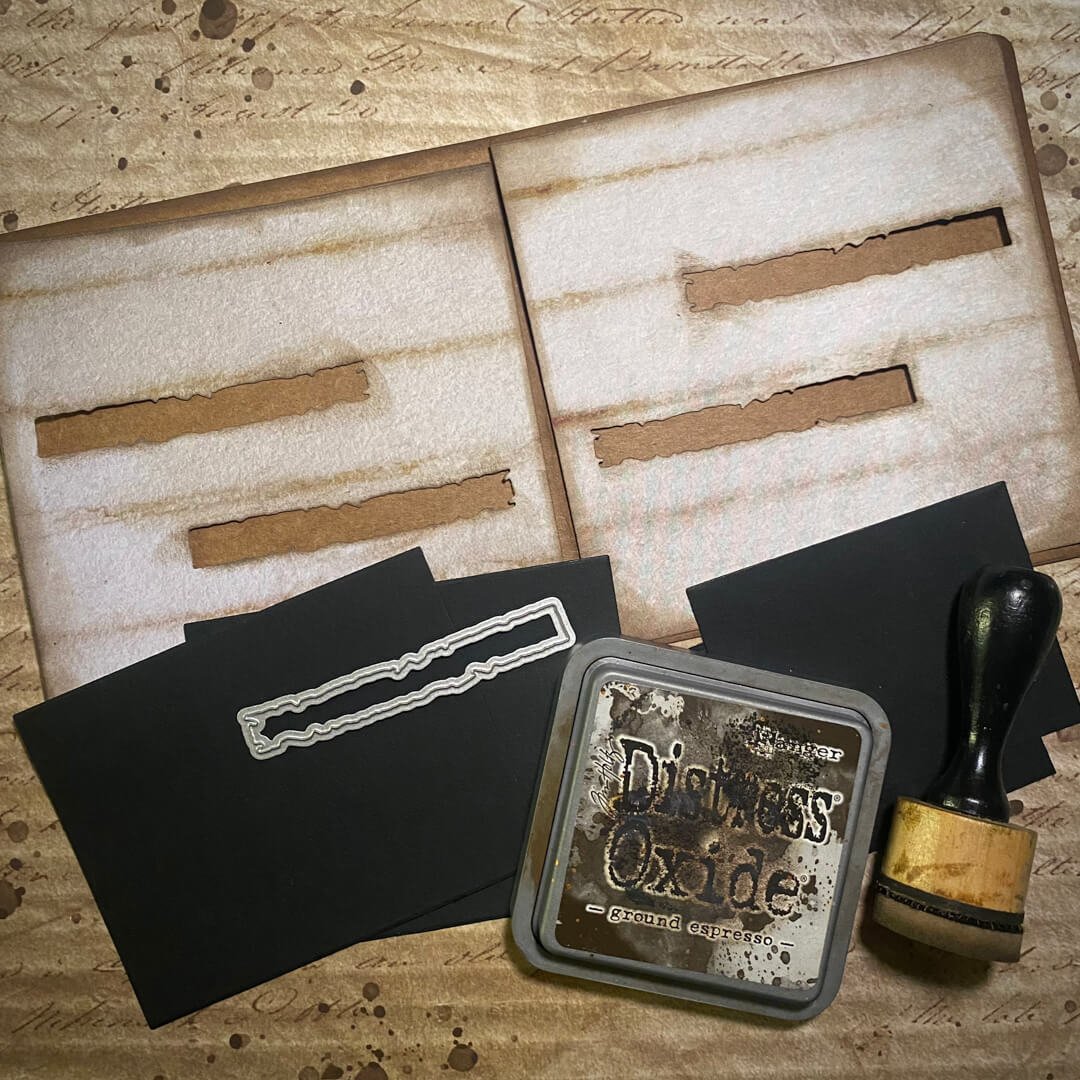
Step 3: Find yourself a piece of black paper. It doesn’t have to be the thickest. We’re going to need 2 pieces measured 7.8 cm x 6 cm and also 2 pieces of 7.8 cm x 9.5 cm. These are gonna be the pockets. We’re glueing them on the back of the matte layers. The 2 smaller rectangles go over the lowest pocket openings. Create a thin line of glue around the edges, on all four sides. Make sure you don’t get any glue in the middle, because then the pocket will be glued shut. Also make sure the longest side (7,8 cm from left to right) will be glued over the the opening, so you don’t see it anymore. If you turn the page over, you’ll notice the pocket openings look black. The bigger black rectangles go over the upper two pocket openings. Make sure the paper measures 7,8 cm from left to right. A big part of this paper will also be glued on top of the smaller pocket, but that is completely fine. Now it needs a little time to dry. If you’re unsure about it, have a look on the picture below. On the left you see the back side of the matte layer, on the right side you see how the front looks like.

Step 4: After a couple of minutes you can glue the whole page down on the base page. The pockets are ready.

Step 5: If you like, you can decorate the matte layer with stencils and stamps the way you prefer. I used a stencil from the winter release and a little bit of ink. You can put the page to the side for now.

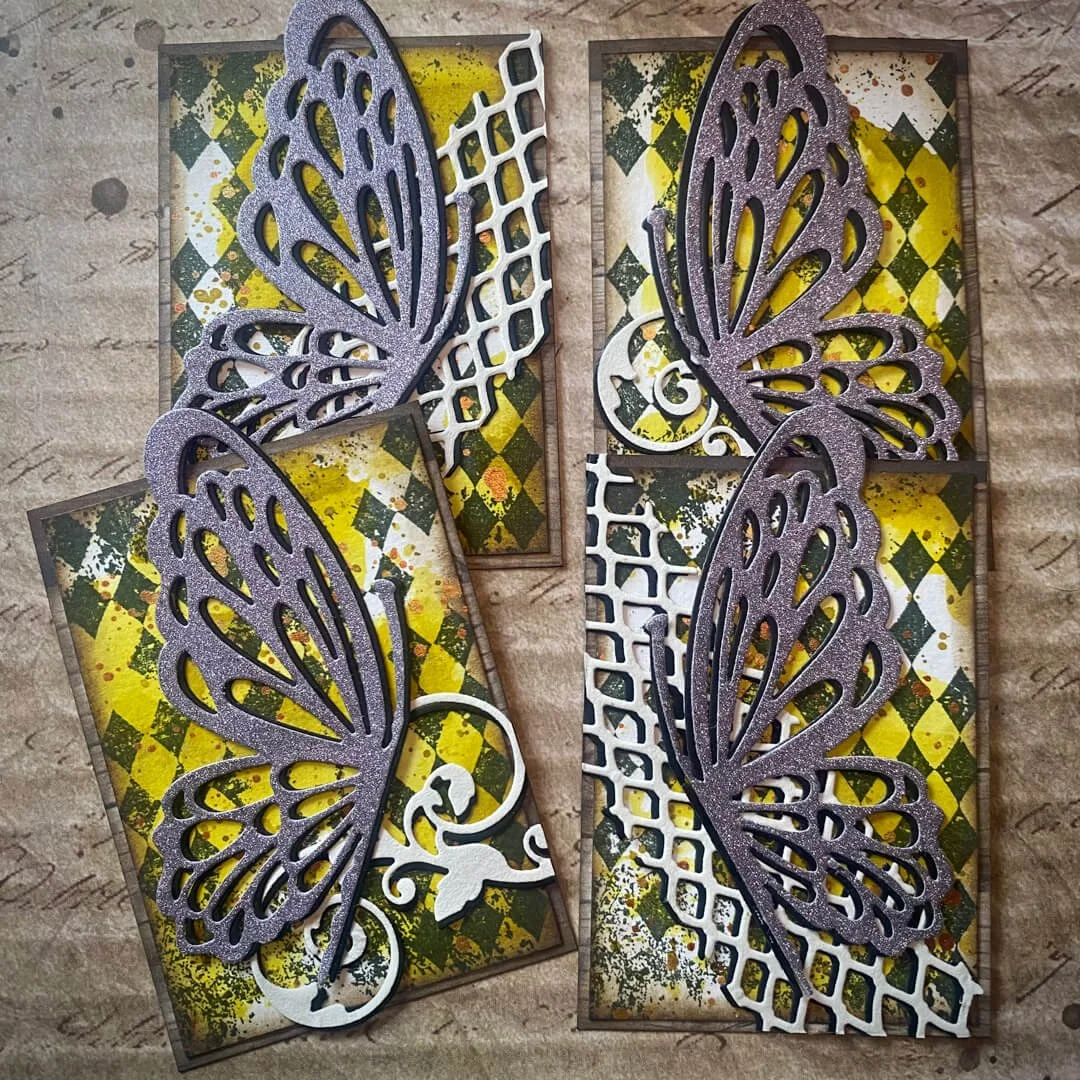
Step 6: We’re going to start with the 4 ATC cards. You can find a rectangle die for that in the ATC die set. If you don’t have it, there’s a rectangle in the die set Torn, with the same measurements or make them yourself. They measure 6.4 cm x 8.9 cm or if you will 2.5 inch x 3.5 inch. These are the base layers of the ATC cards and I’ve used the paper set Rustic Winter. We also need matte layers on the cards with the measurements 6cm x 8.5 cm. You can take any paper you like, but I choose watercolor paper for this one.

Step 7: First we’re going to create a background on the watercolor paper by spraying spray stain or ink on a smooth surface with a little drop of water to water it down. Just dip your card on the surface with stain or ink and let it dry for a moment. You can do this step a couple of times, until you’re satisfied with the coloring. For my background I also used the lovely stamp from the set: Sweatertime. Feel free to use any stamp you prefer. Go wild ! Even some splattering will do great here.

Step 8: Time to do some die cutting. We will need the left and right wing of the butterfly from the die set: Ornate Butterfly. We also need black card stock and a colored one, any color you prefer. Mine is silver with some glitter. We need 2 left wings in black and 2 colored ones. We also need 2 right wings in black and 2 colored ones. From the set: Torn we need the net structured die, 2 times in black and 2 times in white.
From the set: Journal Sleeve Fillers 1 we need the biggest swirl, 2 times in black and 2 times in white.

Step 9: Now we need to glue everything in pairs, black and on top the colored one. So 2 left wings on top of each other, with the black one under the colored one. I tried to glue all pairs a little offset, so it looks like you can see the shadow of the top one. In the end you’ve got 4 offset wings, 2 left and 2 right ones, 2 swirls and 2 net structures. We’re going to decorate our ATC cards with these. First the net or swirl and the butterfly on top. Feel free to create it any way you like or finish it off with something interesting. When your cards are done, they can be stored in the pockets.

And there you have it! A lovely place to store some ATC’s in your journal! I’m really curious how yours going to look like! Feel free to tag me in your creations on Instagram and Facebook, so I can find you!
Big hug for everyone!

Elizabeth Craft Designs Products Used: