Specimen Card with Hidden Paperclip
Hello everyone! Welcome to my first blog post!
In this blog I will be working with the collections of the Art Journal Specials collection. Because I really enjoy making Specimen Cards, I thought it would be fun to write a blog about this. This version with a hidden paper clip is super fun to use in your journal or planner.

Let’s get started!
1. Cut out the base first. For this I used 2x the largest rectangle and 2x the oval from the set Journal Sleeves Fillers 1 - 2163. I used kraft paper for the back and designer paper from the beautiful Coffee Dyed paper pack for the front. Place 2 sheets on top of each other so that you immediately get identical cards. Place the dies on your cutting plates as shown in the picture, then stick them in place with a (washi) tape. You can then be sure that nothing shifts and that your ovals are in the same place on both cards.

Photo 1.1

Photo 1
2. Stamp the front of the card with the stamps you like. I used different background stamps and stamped them with various colors of ink. I used Versafine ink for stamping. I use colors that match the rest of the card 2. Stamp the front of the card with the stamps you like. I used different background stamps and stamped them with different colors of ink. I used Versafine ink for stamping. I use colors that match the rest of the card.

Photo 2
3. I use a finger dauber along the edges of the card with Distress ink (Vintage photo and Black soot). I do this with everything, including the other pieces that I will use.

Photo 3
4. I make splashes on my card with distressed paint (Cracked Pistachio and Spiced Marmalade) and a brush. I like it if there is a subtle hint of color incorporated into the background. When the splatters are dry, I look at which die-cuts I would like to use and which ones I want where and I stick them down. I also use a small piece of cork on it. The front of your card is ready.

Photo 4
5. The flower (Torn - 2110) becomes the center of the card! I'm going to spray these with Dylusions ink because they have nice bright colors. I spray in a cardboard spray box. I use a darker shade for the bottom part of the flower than for the top. Make sure that you color the front and back of the flowers, this will be nicer for the back of your card later because the flower will be in the transparent part.
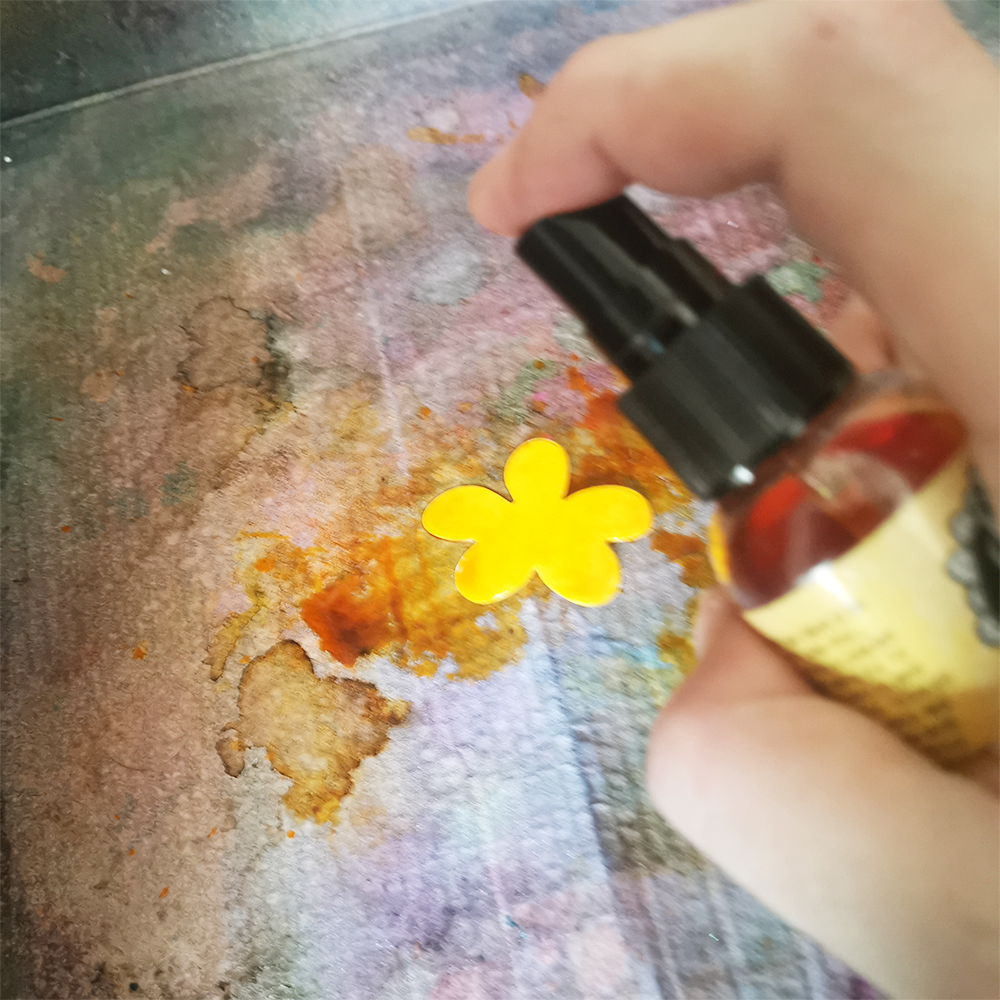
Photo 5
6. With an embossing tool I emboss the lines in the leaves a little more so that they stand out even better when I go over them with a pencil in the next step.

Photo 6
7. I go over the lines of the leaves with a pastel pencil. You can smudge pastel pencils very nicely with a cotton swab. I think that has a very nice effect. Of course, I apply some distress ink along the edges with a finger dauber.

Photo 7
8. I make the pistil of the flower by making dots with a white and a black Posca pen. You stick both parts of the flowers together and your flower is ready. Now you can start creating your window. I used a laminator for the transparent part. Place your flower between a laminating sheet and start laminating. You can of course also use 2 sheets of acetate.

Photo 8
9. Once your flower has been laminated, stick the front of your card to the laminating sheet with strong glue. Make sure that your flower is immediately where you want it.

Photo 9
10. Carefully cut the laminating sheet along the edges of your card.

Photo 10
11. Now it is time to stick your tab (Journal file XL 1) on it so that it will be between the front and the back.

Photo 11
12. You now start with the hidden paperclip on the back of the card. Place your cards in such a way that they are positioned correctly, so that they fit together perfectly and that they are not upside down. (double check ;)) Place a paper clip with the smallest side on the inside, so that the largest part comes out the back.

Photo 12
13. Use extra glue along the paper clip and use double-sided tape if necessary, stick a label on it, the largest from the set Border Flower - 2114 (I just use a black color because you won't see it again later), and press it well so that the paperclip cannot move in any direction.

Photo 13
14. Now apply glue to the entire back and stick your front onto it. Make sure that you have them straight together and press them properly. Your card is now sandwiched.

Photo 14
15. On the back (of your back) you can now see the large part of the paper clip. You will hide this by first sliding a label under the paper clip. (Do not stick this to your card!)

Photo 15
16. Do put glue on top of your label that you just slid under the paperclip and stick your third label on it so that your paperclip is no longer visible. Press firmly and stick a nice phrase on it if you like.

Photo 16
17. Finally, I like to make a nice charm on it. I use my crop a dile for this and of course an eyelet. I lightly applied a little metallic wax to the edges of my card with my finger.

Photo 17.1

Photo 17
Your Specimen Card is now ready with a hidden paperclip! For example, you can now slide this into your journal, planner, or simply into a book. And on the back of the paper, there is a nice clip that looks super nice.

Final Result Front

Final Result Back
Thanks for reading my blog and I hope you enjoyed it!
Love, José
You can follow me on Instagram for more inspiration:
Elizabeth Craft Designs Products Used: